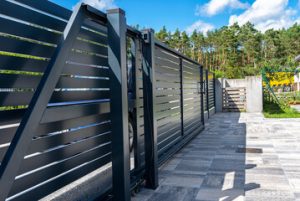
Author: Lucian Gordon

What Is Erosion Control?

Erosion Control Charleston SC is the process of preventing or controlling erosion in agriculture, land development, and construction sites. Adequate erosion controls help avert nutrient pollution, sedimentation, and soil loss.

Erosion Control

Erosion occurs when bare ground is exposed to wind and rain. When the roots of plants hold soil in place, it’s less prone to damage.

Plants have an important role in soil erosion control because they bind the earth together with their roots, slow down water flow and create natural barriers to wind and wave action. They also add organic matter to the soil, which improves its structure and makes it less prone to all forms of erosion. In addition, vegetation provides cover and shade for soil and wildlife.

Erosion occurs most often where there is bare ground, which exposes the earth to wind and water action. Erosion is more likely to happen on light, sandy or silty soils than heavy clay soils. It can also be more pronounced on slopes or embankments, where soil is displaced by raindrop impact and runoff. The presence of grasses, flowers, shrubs and trees can greatly reduce the amount of bare soil on your property.

Vegetation is the most natural and effective way to prevent erosion, as it binds the soil with its root systems and slows down the movement of rainwater and water runoff. The more extensive a plant’s root system, the better it is at reducing surface erosion. Plants with lateral, spreading root systems, such as ivy and creeping phlox, are more efficient at erosion control than vertically structured plants with tap roots.

Several species of ferns are excellent at stopping erosion, particularly those with long, feathery leaves, such as coastal and big leaf fern, and the wood fern (Dryopteris fimbriata). A common woodland plant, ostrich fern, is also good for stopping erosion in wet, shady areas. Other sedges that stop erosion include Pennsylvania, Appalachian and plantain leaf sedge.

Riverbank lupine (Lupinus arvensis) stops erosion by pulling water into its underground roots. It is a legume, so it adds nitrogen to the soil as well. Other lupines that are good for erosion control include bearberry, rockpray and willow leaf cotoneaster, all suitable for USDA zones 5 through 8. All of these have spreading roots that help to protect the soil. Other plants that are suited for shady, moist areas include moss, sweet-smelling heucherella and tri-colored periwinkle. All are available in seed blends and sod, although it takes four to six weeks for the latter option to take hold.

Retaining Walls

Retaining walls are structural features that can add interest and beauty to your yard. They are also a necessity in the fight against erosion. These structures stabilize slopes, prevent landslides, and create terraces for gardening and other uses. They also help to keep soil in place, preventing runoff into storm water sewers and rivers where it can damage or pollute our environment.

Homeowners can choose from a wide variety of materials, colors and textures to design a beautiful structure that blends with the landscape and complements their home’s aesthetic. However, retaining walls are not only functional — they add value to the property and can make it more appealing to prospective buyers.

Sloped areas are often difficult to use. Even a small amount of rain can cause soil to wash down the slope and erode, leaving behind unsightly debris or damaging your lawn or garden. With a retaining wall, it is possible to level and terrace the land for increased usable space. You can build a terraced area for new patios and decks, or plant eye-catching flower gardens and shrubbery.

A retaining wall can be constructed from many types of material, depending on your needs and budget. If your goal is to simply increase the attractiveness of the property, you can choose from a number of decorative options including natural stone, bricks or flagstones. If your primary goal is to combat erosion, you may want to consider a more sturdy and durable solution such as concrete or masonry.

In order to resist the immense pressures of a retaining wall, it is important that it be properly built and maintained. Checking for signs of damage and taking prompt action is essential. It is also a good idea to regularly monitor the soil behind your wall and to plant trees and other plants that will anchor the soil. This will help to prevent soil movement and promote healthy growth of the vegetation that you have chosen to plant.

There are several different types of retaining walls that can be used to combat erosion and create terraces. Whether you are building a simple gravity wall or a more complex structure, it is important to consult with a professional before beginning construction. This will ensure that the project is completed according to state and local regulations and will be able to withstand the environmental conditions where it is located.

Sediment Basins

Sediment basins are open water ponds that capture coarse sediment and litter carried by stormwater, preventing it from entering waterways. They are a critical element in any erosion control system and should be used on every site, regardless of project size or construction duration.

The design of a sediment basin needs to be tailored to the specific site conditions. For example, very stony soils that are likely to generate a significant amount of inflow jetting will require the inclusion of a riffle/broad crested structure within the forebay to dissipate flow and minimise sediment accumulation (and consequently maintenance requirements). The design should also consider whether the basin needs to be lined or not. Lined basins are more durable, however the cost of lining can be prohibitive for smaller ponds.

Ideally, the design will include a high flow bypass weir or spillway to direct large flows away from the sediment basin and downstream treatment systems. The spillway should be armoured with rock to prevent scour and be designed to limit the frequency of sediment re-suspension.

It is important that the sediment basin is hydraulically efficient so that as much of the coarse sediment as possible can be settled. This is achieved by ensuring that the settling zone has an effective depth of 1.5-2m. This will reduce the volume of turbid water discharged from the pond, which in turn improves settling efficiency.

The use of baffles within the settling zone can also be useful to increase settling efficiency. These can be made from coir fibre, porous geotextiles or a turbidity barrier and are designed to disrupt the flow patterns in the pond, decrease velocities and encourage aggregation of fine sediment.

For sites where the use of sediment basins is not feasible, such as linear construction projects or when a site’s Right of Way does not permit for their construction, the focus must be on the implementation of all other reasonable and practicable erosion control measures. The monitoring of water quality parameters at these sites will be a key part of this.

Chemical treatment of the water entering and leaving a sediment basin is often required if sediment is not being effectively removed by the sediment basin alone. Jar tests will need to be conducted to determine which coagulant or flocculant is most appropriate for the site.

Storm Drains

Many people have heard the famous line from George Costanza in Seinfeld, “I don’t understand the difference between a storm drain and a sewer system.” The truth is that there is a major distinction. The main function of a storm drain is to transfer storm water away from city streets, houses and buildings. This water goes through a series of underground pipes and eventually ends up in lakes, rivers and the ocean.

A city’s storm drain system works well in theory, but it can be harmed by improper maintenance and lack of attention. While the water is being transferred, it picks up debris such as lawn chemicals, paint, household cleaners and oil that wash directly into a stream or lake. This pollution causes the erosion of streambanks and disturbs aquatic habitats.

The best way to help maintain a storm drainage system is to not dump anything down a drain. Instead, use your curbside garbage bins or make a compost pile. Do not blow grass clippings, leaves or plant debris down the street either. These materials can clog the storm drains and cause flooding or erosion in your neighborhood.

Storm drain grates are also a good tool in preventing erosion and floods. These can be installed in low areas of a parking lot, trenches and sidewalks. The idea is to have these grates redirect rainwater and melted snow away from homes, buildings and paved surfaces and into a natural body of water like a creek or river.

However, a storm drain can get overwhelmed during heavy rains or even a large hailstorm, and may begin to mix in sewage. This is why it’s important to limit the amount of debris that goes down a storm drain and to install detention tanks in a house or business to keep excess water from entering the public storm drainage system during heavy rains. This will prevent the drains from becoming inundated and can save you money on water bills. Alternatively, permeable pavements can be used in urban areas to allow rainwater to infiltrate into the soil or evapotranspire through vegetation.

How to Become a Bricklayer

Brick Layer Perth is a skilled builder who constructs, repairs, and maintains building walls. They may also be responsible for laying and concreting foundations for new construction. They can undertake this work by completing a certificate or an apprenticeship or working on the construction site as part of their employment.

Bricklayer

They typically work with traditional bricks and concrete cinder blocks but can also work with structural tiles, salvaged bricks, and chunks of marble. The job requires stamina and strength to perform productive work throughout shifts and weather changes.

Bricklayers use bricks and other building blocks in mortar to construct or repair walls, houses, and other structures. They usually work as part of a team with other construction professionals and must be able to follow blueprints and specifications. This job can be physically demanding, particularly when laying bricks at height. Bricklayers may also need to erect and dismantle scaffolding on large construction projects and should know the safety requirements.

Bricklaying is a skilled trade that requires training and on-the-job experience. Some bricklayers start their career with an apprenticeship, earning money while learning the business fundamentals from an experienced journey bricklayer or mason. Others attend a vocational or trade school, receiving classroom instruction and hands-on experience working on real-world construction sites.

A bricklayer’s responsibilities include interpreting work orders, determining the required materials, and laying and stacking brick courses by the blueprints. They must also be proficient in cutting and shaping bricks with various tools. Other duties include:

  • Grouting.
  • Repairing and maintaining brickwork.
  • Using various hand tools and power equipment.
  • Fastening bricks with wire clamps or cement.

Some bricklayers are responsible for constructing foundations and resurfacing roads, while others may specialize in decorative brickwork or stone masonry.

Many qualifications to become a bricklayer include a high school diploma and on-the-job training. Those interested in this career should be able to read and interpret diagrams and specifications and have a valid CSCS card for most on-site jobs. They should also be proficient in using various construction tools and equipment, including power saws, concrete mixing machinery, and masonry chisels. In addition, they should have good verbal communication skills and be able to work safely on a construction site.

A bricklayer’s duties include preparing and laying concrete for footings, foundations, and other structures. They may also be responsible for constructing and repairing walls, fireplaces, arches, chimneys, and other structures. Sometimes, they may need to erect and dismantle ladders, swing stages, and scaffolding. They should also be familiar with the safety requirements of each site and wear protective gear such as gloves, ear defenders, and work boots.

A high school education is usually required for those who want to become bricklayers. It is important to take vocational courses in shop, basic mathematics, blueprint reading, and mechanical drawing. These skills can help you later in your career as a bricklayer or mason.

The most common way to start a bricklaying career is to find an apprenticeship with a construction firm. This involves classroom studies and on-the-job training under a master bricklayer or mason. Apprentices begin at about fifty percent of a qualified journey bricklayer’s hourly wage and work up to the full rate. Apprenticeships are available through local unions and some colleges.

In addition to on-the-job training, bricklayers receive classroom instruction that can include the science of building materials and how to read and interpret blueprints. They must understand how to use hand tools like hammers and levels and power equipment like sled hammers and hydraulic jacks. Bricklayers should proficiently use masonry tools such as chisels and special saws. They should also have good verbal communication skills to interact with supervisors, engineers, and clients.

Some bricklayers also specialize in particular types of masonry. For example, a tuck pointer repairs damaged mortar in existing masonry structures. Other specializations include brick veneering, full brick construction, and repair of partitions and arches. Masons may also choose to focus on decorative brickwork or stone masonry.

While bricklayers work with traditional clay bricks, concrete cinder blocks, and other building materials, they can also build with structural tiles, chunks of marble, and terra cotta blocks. They must have a solid understanding of the science of construction materials and occupational health and safety regulations.

Bricklayers and masons must complete at least four years of apprenticeship and classroom study to qualify for trade certification. Then, they can apply to write the interprovincial journeyperson’s exam. This will allow them to move into more advanced roles like supervisor or site foreman. They can even start their own masonry company.

Bricklayers work on construction sites and repair structures. The job involves laying bricks, concrete blocks, stone, and other similar materials to construct or repair walls, arches, chimneys, fireplaces, and other structures by blueprints and specifications. They can also work in maintenance, repairing existing brick structures such as brick linings of industrial furnaces and kilns.

Bricklaying is a physically demanding job. It is often required to carry heavy loads, which could cause back or other physical injuries if not maintained properly. Moreover, bricklayers are needed to work at heights and on scaffolding. Falls from height are a common workplace accident and can lead to severe injuries. Working from a ladder can be dangerous, and it is recommended to use framed scaffolding instead.

The job requires good attention to detail and knowledge of safety and health issues. Bricklayers should always wear safety gear such as hard hats, dust masks, steel-capped boots, ear defenders, and gloves. They should also ensure they do not touch wet mortar, which can cause dermatitis or rashes. Inhaling wet cement dust can also cause respiratory problems.

Most bricklayers are employed as apprentices until they become qualified. They are normally paid a minimum of AU$ 40 per hour. In addition, they may receive time and a half for overtime work. They should also be aware that wages can vary from one region to another.

A bricklayer must have a strong, steady hand and the ability to read technical plans and diagrams. They must also be able to understand and follow directions. They must also be able to work well as part of a team. On larger jobs, bricklayers are often grouped into teams or gangs to complete projects on schedule. Some bricklayers specialize in ornamental brickwork or stonework and can make buildings and walls more attractive by using various styles and colors. They can also perform tuckpointing, filling areas where mortar has deteriorated or fallen out. This makes the bricks look new again. This is a highly skilled job and requires years of experience to master.

A variety of factors influence a bricklayer’s earnings. For example, novices typically earn less than seasoned professionals. However, their earning potential ascends over time as they acquire hands-on experience and build a portfolio of completed projects. The geographical setting also plays a crucial role, with urban areas typically offering higher wages than rural regions.

A qualified bricklayer can interpret building blueprints and lay the foundations for houses, roads, and sidewalks. They may also work on restoration projects to refurbish decorative stonework and other masonry structures. Whether new construction or repairing existing masonry, bricklayers must follow strict safety protocols to ensure on-site worker and client safety.

Bricklayers must possess various tools and equipment, from trowels and levels to scaffolding. They must operate these materials efficiently and accurately to achieve precise results. Furthermore, bricklayers need the stamina to perform productive work throughout the shift and endure weather conditions.

Many bricklayers learn their trade through a formal apprenticeship with a reputable construction firm. These apprenticeships provide on-the-job training as well as classroom instruction. Apprentices typically start with lower wages than experienced bricklayers, but their earnings climb as they gain expertise and complete more complex tasks.

In addition to their construction skills, bricklayers must be familiar with various building codes and regulations to ensure the final structure meets local and state requirements. A good knowledge of how to read and understand blueprints and a strong grasp of geometry and math are essential.

Bricklayers must also have a strong work ethic and be able to meet deadlines. During peak periods, they often need to work overtime to finish a project on schedule. This is especially true for large-scale and complex projects.

Some bricklayers pursue additional education or certification to enhance their career prospects and earnings potential. These credentials can help them secure more lucrative job opportunities or qualify for supervisory roles. It is also possible for bricklayers to increase their salaries by changing employers.

Stucco Repair 101

Stucco repair might seem intimidating, but with the right preparation, it’s a manageable task. From repairing cracks to restoring crumbling stucco, it’s important to address the damage as soon as you can to avoid further problems. Hairline cracks that are less than 1/4 inch can be mended with caulking. However, larger cracks require more extensive work.

Cracks

Regarding Stucco Charleston SC repair, cracks are among the most common problems. Cracks can be cosmetic or they can indicate that structural damage is occurring and needs to be addressed by a professional. The good news is that most of the time these cracks can be easily fixed by a do-it-yourselfer.

stucco

The first step in repairing cracks in your stucco is to clean the area with a hose. This removes any dirt or algae that may have accumulated over the years. Next, using a hammer and chisel, open up the crack slightly in a V shape to allow the caulking to fill the gap. Then, use a wire brush to scrub the inside of the crack. This will remove any loose stucco that is easily broken and will give the caulking something to bond with.

Once the area is cleaned, mix up some premixed stucco patching material and apply it to the crack. If it’s too thick, you can agitate it with your putty knife to help the material flow into the crack. After the patching material dries, it can be painted over, if desired.

Hairline cracks, which are narrow and about 1/16 inch wide or less, are the most common type of crack in stucco. They can be caused by many things including an improper mud mixture, new home settlement (from drying timber/framing), and seismic movement.

Stucco hairline cracks are typically cosmetic and can be filled in with ease by a do-it-yourselfer. However, if the cracks are wider or they appear to be spreading, it’s best to call in a professional to have the problem evaluated and repaired. This is especially true if the cracks are accompanied by sticking doors or windows, as this could indicate that moisture has penetrated behind the stucco and is causing the foundation to shift. A professional can also make recommendations for correcting the underlying problem. This might include adding a layer of mesh or more base coat material to reinforce the structure, which will help prevent further cracking. If this is done correctly, the cracks can be blended in to the surrounding stucco and no one will know that there was ever a crack there.

Stains

Stains can occur for a variety of reasons and they need to be treated immediately. They can be caused by water intrusion that seeps through the stucco and dries, leaving expanding salts on the surface or by oil or grease spilling onto the exterior walls of a house. Stains can also be caused by mold, mildew, and algae growth that stains the stucco green. The best way to address these types of stains is to wash the stucco with a cleaning solution that is formulated for masonry materials, such as a cleaner that contains bleach.

During the washing process, it is important to check for hairline cracks in the stucco. These cracks must be repaired before the stucco can be cleaned to prevent moisture from entering the walls and causing more damage. These cracks can be repaired by using an exterior acrylic caulking that is matched to the color of the stucco.

After the cracks are filled and the staining has been addressed, the stucco can be washed again with a cleaning solution. For most stains, a simple mixture of liquid dish soap and water will do the trick. Stubborn stains, such as those caused by mold and mildew, may require a bit more scrubbing with a soft-bristle brush or even a rotating brush attachment on a power washer. The stains will eventually disappear and the stucco can be left looking beautiful again.

Some homeowners choose to use a copper biocide on their stucco in order to keep it free of mold, mildew, and algae growth. When used correctly, this can keep the stucco looking its best and will not harm the environment. However, it is important to note that these products are not permanent and will have to be reapplied regularly. A professional can help determine if this is the right option for you. They can also offer suggestions on preventing future staining problems with your stucco. These suggestions may include placing a barrier of rock, mulch, or other ground cover over the dirt around your home to help stop it from seeping up on the stucco walls and making them discolored.

Water Damage

When stucco is damaged, water can seep through to the underlying substrate and cause extensive damage. This is often caused by roof or plumbing leaks, but can also occur from condensation if the building is not well ventilated. In any event, water infiltrating the stucco can lead to mold and mildew growth, which is often accompanied by a musty or damp smell.

Stucco repair for water damage can be difficult and should only be done by a professional. The first step is to remove any loose or crumbling stucco and clean the area to make sure it’s free of any mold or dirt. Next, the patch area must be sanded down so it is flush with the surrounding wall. Finally, it’s important to use a waterproof sealant on the entire area.

Once the sealant is dry, it’s time to start the actual repair. Using a hammer and chisel, carefully remove any areas of damaged stucco. If possible, try to leave some undamaged stucco in the corner of the repair area to help with ventilation. Pull back the metal lath (using tin snips) and house wrap or felt paper in the area of the stucco that is being repaired, but leave it in place on the margins of the damaged area. Use acrylic exterior caulk to seal the house wrap and lath seam.

When working on stucco repairs, be careful to use a mix that’s specifically designed for stucco. This will ensure that the patch will not only be durable, but that it will match the color of your existing stucco. It’s possible to buy pre-mixed stucco repair material, or you can mix it yourself in a wheelbarrow or plastic tray following the manufacturer’s instructions.

While some handy homeowners may be able to tackle minor stucco repairs on their own, any extensive water damage or structural issues should be left for professionals. For more serious issues, you may need to consider stucco remediation, which is a complete replastering of the wall system that addresses the underlying problems and prevents future moisture intrusion. Find vetted stucco contractors in your area today.

Mold

Stucco repair often includes cleaning and repairing mold. Mold growth usually means that there is moisture trapped behind the stucco and that this moisture is rotting the wood lath supports. This is a serious problem and can cause structural damage to the building.

The best way to prevent mold is by keeping the stucco free of dirt and debris. It’s also a good idea to carefully inspect the stucco for signs of moisture, including a musty odor and places that feel damp to the touch. Mold thrives in moist areas and likes to feed on organic matter, so examining the area surrounding gutters, doors, and windows is an especially good idea. It’s also a good idea too look around and closely examine any trees, flowers, or bushes that grow near the house to see if they are feeding on the stucco and contributing to the mold problem.

Aside from cracks, the most common sign that a property’s stucco is failing is staining or discoloration. This is often accompanied by a musty odor and the feeling that the stucco crumbles when touched. If you notice these symptoms, then it’s time to call for a professional inspection and repair.

Most stucco repair projects start with an initial inspection. During this time, the contractor will assess the damage, determine the cause of the problem, and recommend a course of action. This can range from simply spraying the stucco with a special water-resistant polymer, to replacing or reapplying more stucco.

When the underlying issue is remedied, it’s not uncommon for the entire stucco system to last much longer than if no steps are taken to protect it from moisture. The key is to create an adequate drainage plane that will allow the stucco and underlying materials to dry out before more significant damage occurs.

Remediation is not just a good idea for properties with failing stucco, but for all buildings. All types of buildings, including high-end luxury homes, can experience moisture problems that lead to rot and mold, which if not addressed quickly can destroy the building.

Navigation