How to Properly Maintain Your Custom Concrete BBQ Pits

A quality built-in grill is a staple in any backyard, giving you plenty of cooking space to turn out charred masterpieces. These systems can be powered by charcoal, propane in a tank or cylinder, a gas line, or electricity. For more information, you can visit Custom Concrete BBQ Pits to proceed.

Build a simple barbecue pit that uses cinder blocks, bricks, and a grill grate. This no-frills pit is suitable for a butterflied 75-pound hog.

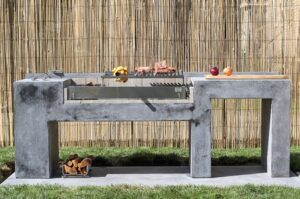
Adding a concrete barbecue pit to your backyard can create the perfect focal point for entertaining friends and family or spending time outdoors. Depending on your backyard and how you plan to use the BBQ pit, choosing the right design and material is important.

Some people can construct a basic barbecue pit using standard materials they already have in their homes. Others may find it easier to buy a barbecue pit kit that includes everything they need for construction. This can be a good option for those with limited DIY skills or who want enough space to make the barbecue pit work with their outdoor design plans.

Another decision homeowners need to make when choosing a BBQ pit design is whether they want a temporary or permanent structure. Those who prefer a more permanent barbecue pit will likely need to build it on a brick, stone, or concrete foundation. They may also need to consider options for seating and other features that will make the pit feel like a part of their backyard instead of an afterthought added to the garden because a barbecue pit was wanted.

Those building a permanent barbecue pit will need to consider how much work it will take to maintain the pit. If they use a grill, they will need to ensure they have enough gas or charcoal on hand to keep it working at the proper temperature and that they can get it replaced quickly when it runs out. A permanent barbecue pit must also be constructed on a level surface and situated away from grass, shrubs, and other overhanging objects that could catch fire.

Those who want to maximize the functionality of their barbecue pit can opt for a design that incorporates cabinets and drawers. This allows them to store their supplies and tools where they can be easily reached. These can include utensils, paper towels, a trash can, and other supplies to help them enjoy their backyard cooking experience.

A custom concrete BBQ pit is a great addition to any outdoor living space. Not only will it make your backyard more attractive, but it will also increase the value of your home. Homebuyers love to see a well-designed outdoor living area and will be willing to pay more for a house with a fire pit.

Many different types of barbecue grills are available on the market, so it is important to choose the right one for your needs. It would help if you decided what fuel you want to use – gas or charcoal – and what size of cooking surface you need. It would be best to consider whether you want a built-in barbecue or an attached smoker.

If you are a beginner at building a Barbecue pit, start with something fairly simple and easy to make. Get some plans to follow, and gather your tools and materials before you begin. You will need a shovel, cinder blocks (or bricks), a grill, and some cover for when you are not using the pit.

Before you start, it is a good idea to lay out your plan on the ground to see how the finished product will look. This will help you visualize the project and ensure it is the right shape and size for your yard. You must also decide what kind of finish you want on the pit. There are various options, including stainless steel and Dekton, but each has benefits and drawbacks. Stainless steel is easier to clean and smudge-free but can be expensive. Wood looks natural and is a beautiful option, but it can quickly dry out and crack in the desert heat.

Once you have your plan, it’s time to get to work! Be sure to wear protective gear and follow all safety precautions. Once your pit is built, testing it by cooking food is a good idea. The pit must be level so that it cooks evenly. You can place a spirit level over the top of the pit to check that it is.

A custom concrete barbecue pit is an eye-catching addition to any outdoor living space. It becomes the focal point, inviting people for fun and conversation. A well-designed pit also increases property value. People who shop for homes like to see a backyard fire pit and are willing to pay a premium for the property with one.

When designing a barbecue pit, homeowners first need to decide whether they want a temporary or permanent structure. They should also evaluate their DIY skills and determine what they plan to cook, as this will help them choose the right materials and design. For example, someone who wants to grill burgers and hot dogs may not need a large grill that can hold several briquettes, but a person planning on cooking a whole pig should consider a Southern-style pit bigger than a standard barbecue pit.

Homeowners can use several different materials to build a barbecue pit, but they should be sure that any used materials are safe for burning and won’t melt. They should also identify utility lines before digging to avoid disrupting services and causing damage. Depending on the location, people should also evaluate wind patterns to ensure the pit won’t blow smoke toward their houses or neighboring homes.

Once they have a plan, homeowners can construct the barbecue pit. They can buy pre-made kits containing most of the materials they need, but they should carefully follow the instructions closely. If they are still determining their ability to construct a barbecue pit themselves, they should consider hiring an experienced contractor.

Besides a barbecue grill, some homeowners may opt to add a smoker. This can be a good way to enjoy the flavor of slow-smoked meats, such as beef brisket or chicken wings. A smoker can also be a useful tool for making sauces and rubs.

Concrete fire pits are a beautiful and timeless addition to any outdoor space. However, homeowners should know the maintenance required for these impressive backyard additions. From winterization to cleaning techniques, there are a few things every homeowner should know about this important aspect of concrete firepit maintenance.

Before starting to clean your concrete fire pit, it is important to ensure the flames have completely died out and that no burning debris remains on the surface. Once this is complete, you can begin to clean the surface of your firepit by using a garden hose and a stiff-bristled brush. After rinsing off your concrete barbecue pit, you can use a mild concrete cleaner to remove any grime and stains from the surface of the firepit.

It is also important to check for cracks or chips in the surface of your concrete BBQ pit. To repair them, first vacuum up any sand around the crack or chip and mix concrete patching compound according to the instructions on the package. After mixing the compound, apply it with a concrete trowel and smooth it to the surrounding area.

When choosing the right location for your barbecue pit, select a safe place away from grass, bushes, or overhanging trees that could catch fire. In addition, it is a good idea to keep the barbecue pit 10 to 15 feet away from your home. It is also important to evaluate the position of your firepit about common wind patterns and how they may blow smoke.

Preparing For Dock Installation

Dock Installation has a well-deserved reputation for being the most hated chore cottage owners face each spring. If you have a conventional wood and concrete dock, it may involve augering in deep muck and back-breaking work.

Dock Installation

Fortunately, you can avoid this pain by following these simple tips to simplify your dock installation this spring.

The type of dock you choose depends on how you use the waterfront. Do you want a platform to launch boats, or do you enjoy kayaking and stand up paddleboarding? What about fishing? Will you need a place to store and moor boats when not in use, or maybe even a boat lift?

Depending on your climate and the type of waterfront, you may need to consider how well a dock can withstand winter weather. And, if your shoreline is within a buffer zone or in an area of wetlands, you may need additional approvals from local governments, state agencies, and sometimes the U.S. Army Corps of Engineers.

Many waterfront homeowners are also interested in a floating dock because they can be used all year round and won’t need to be removed for the winter. And, they’re often more affordable than other types of permanent structures.

Lastly, if you’re considering a shared waterfront, it’s important to learn as much as you can about how your community handles moorage and maintenance. Some communities have deeded boat slips, while others rely on a system of rotation and sharing.

As you consider your options, remember that a wooden dock is more likely to rot and require yearly maintenance than a vinyl or aluminum one. Cedar is the best choice because it’s naturally rot-resistant. However, if you can’t afford cedar, consider a composite decking material that’s made of wood fibers and plastic. This durable material doesn’t need painting and is extremely wear-resistant. It’s also eco-friendly. Regardless of your choice, make sure to choose an installation company that can provide quality work and the support you need during construction.

Know Your Anchoring System

When dock installation is underway, it’s important to have an idea of how your new floating dock will be anchored. The type of anchoring system you choose will determine how the dock behaves in high winds and wavy conditions, as well as how it adjusts to changes in water levels from season to season.

A concrete block anchor is the most common choice because it is easy to install and durable enough for most waterfront environments. If your dock is going to be large, you may want to consider additional anchors for added stability. If the area where you plan to put your boat dock is rocky, you might want to look into a cable anchoring system that attaches a series of cables to a shore or weight in the water.

You also want to consider the height at which you plan to set your dock. If you live in a windy lake area, your dock will need to be high enough to avoid being flipped by heavy gusts of wind. On the other hand, if your dock is near neighbors and is likely to see similar weather conditions, you might want to set it lower.

When you’re ready to put the anchors in, place long pieces of wood under them to avoid damage to your decking. Then, connect a chain to the eyebolts or rebar of each anchor to tie them together. Be sure not to cut the chain too short, as this puts extra stress on the anchors and makes them more vulnerable to moving or sliding.

You should also consider using a pole and sleeve style anchoring system if your waterfront has a rocky bottom. This type of system consists of stiff vertical sleeves attached to the dock that hold long poles made of galvanized steel. A winch and cable system runs through the sleeves to make it easier to withdraw them from the lake bed when necessary.

Mark for Fasteners

As anyone who has been around fasteners for any length of time knows, there are many different standards that provide specifications for various types of fasteners. These specifications cover everything from the material that the fasteners are made of to their dimensional tolerances and plating. Most of these standards exist to help standardize how products are made and to give buyers a sense of accountability and confidence in the product they are purchasing.

One of the standards that exists is called the Fastener Quality Act, which requires all fasteners to be marked with a unique symbol created by the manufacturer for traceability purposes. This ensures that the manufacturer can be held accountable if there is ever a problem with the product. The unique identifier that is used by Wilson-Garner can be seen in the image below.

Most of the different grades of fasteners are identified by a series of radial lines on the head of the fastener, with the exception of small (less than about 1/4″) and slotted or recessed heads, where there isn’t room to place the radial marks. The numbering system differs by grade and class. For example, a head with no markings is grade 2, while those with three radial lines is grade 5, and six radial lines means it’s grade 8.

Many manufacturers also mark their fasteners in other ways to identify their product and to make sure the end user has all of the information they need to properly use them. For instance, a lot of bolts have the manufacturer’s name or trademark printed on the head or hex portion of the fastener. Additionally, some have a special coating on their head such as Permatex Bolt Mark, which is a tamper-proof indicator paste that allows you to see if the bolt or screw has been stripped or tampered with.

Pre-Assemble as Much as You Can

Before you begin construction, it’s a good idea to pre-assemble as much of the dock as possible. This will save you time and money when you’re ready to get started. Most aluminum floating docks come in kits that include the components for the dock itself, as well as instructions. The kits are easy to assemble and modular, so even homeowners with limited DIY experience can put them together.

Before beginning, locate a concrete surface that’s free of obstructions where you can start to assemble your dock. Remove the pins and fasteners that were attached for shipping purposes and start to assemble your dock section by section. Look at the reference medallions on each section to make sure they are oriented correctly. Once the base is in place, you can start to install the decking. Make sure to space the boards evenly and leave a little bit of space between them for water drainage and prevent sagging. After installing the decking, you can then add bracing and cross members. These are important because they help distribute the weight of the boat dock more evenly and prevent sagging.

You’ll also want to think about how you’ll use your dock, such as for entertaining or mooring a boat. These factors can affect the size, structure and electrical capabilities of your dock. The type and style of your dock also impacts its final price. For example, permanent wood and concrete docks can cost more than a floating aluminum dock. Other factors that determine the final project price include climate, location and water depth. It’s also important to factor in the cost of annual inspections and cleaning. These services can run $150-$500 or more depending on the type of dock.

Float Over the Winter

Floating docks are a great way to get out on the water and moor your boat, but they can be subject to damage from winter weather. If you live in an area that has a cold climate, it’s important to plan ahead when it comes to disassembling and storing your dock for the season.

First, choose a day for your dock removal that is free from snowstorms and other inclement weather. It’s also helpful to recruit a friend or family member for assistance, especially if you have a lot of fasteners to remove. Having a good plan will help you make the most efficient use of your time, and you’ll be able to complete the job faster too.

If possible, you should store your floating dock sections in an enclosed area for the winter – like a garage or shed on your property. This will keep them safe from debris and weather, and will prevent the need to disassemble and reassemble them in the spring. If this is not an option, try to place your modular dock in a protected bay with at least two feet of room between it and the rocky shoreline. This will give the dock room to move when ice expands and shifts in the winter.

Another alternative to removing your dock for the winter is to add “skimmers” to it. These are little fans that can be submerged at the end of your dock to circulate water and avoid a buildup of ice, which would damage your dock. If you do decide to float your dock over the winter, be sure to mark it so that snowmobilers and other people don’t accidentally trip on it!

Stucco Repair 101

Stucco repair might seem intimidating, but with the right preparation, it’s a manageable task. From repairing cracks to restoring crumbling stucco, it’s important to address the damage as soon as you can to avoid further problems. Hairline cracks that are less than 1/4 inch can be mended with caulking. However, larger cracks require more extensive work.

Cracks

Regarding Stucco Charleston SC repair, cracks are among the most common problems. Cracks can be cosmetic or they can indicate that structural damage is occurring and needs to be addressed by a professional. The good news is that most of the time these cracks can be easily fixed by a do-it-yourselfer.

stucco

The first step in repairing cracks in your stucco is to clean the area with a hose. This removes any dirt or algae that may have accumulated over the years. Next, using a hammer and chisel, open up the crack slightly in a V shape to allow the caulking to fill the gap. Then, use a wire brush to scrub the inside of the crack. This will remove any loose stucco that is easily broken and will give the caulking something to bond with.

Once the area is cleaned, mix up some premixed stucco patching material and apply it to the crack. If it’s too thick, you can agitate it with your putty knife to help the material flow into the crack. After the patching material dries, it can be painted over, if desired.

Hairline cracks, which are narrow and about 1/16 inch wide or less, are the most common type of crack in stucco. They can be caused by many things including an improper mud mixture, new home settlement (from drying timber/framing), and seismic movement.

Stucco hairline cracks are typically cosmetic and can be filled in with ease by a do-it-yourselfer. However, if the cracks are wider or they appear to be spreading, it’s best to call in a professional to have the problem evaluated and repaired. This is especially true if the cracks are accompanied by sticking doors or windows, as this could indicate that moisture has penetrated behind the stucco and is causing the foundation to shift. A professional can also make recommendations for correcting the underlying problem. This might include adding a layer of mesh or more base coat material to reinforce the structure, which will help prevent further cracking. If this is done correctly, the cracks can be blended in to the surrounding stucco and no one will know that there was ever a crack there.

Stains

Stains can occur for a variety of reasons and they need to be treated immediately. They can be caused by water intrusion that seeps through the stucco and dries, leaving expanding salts on the surface or by oil or grease spilling onto the exterior walls of a house. Stains can also be caused by mold, mildew, and algae growth that stains the stucco green. The best way to address these types of stains is to wash the stucco with a cleaning solution that is formulated for masonry materials, such as a cleaner that contains bleach.

During the washing process, it is important to check for hairline cracks in the stucco. These cracks must be repaired before the stucco can be cleaned to prevent moisture from entering the walls and causing more damage. These cracks can be repaired by using an exterior acrylic caulking that is matched to the color of the stucco.

After the cracks are filled and the staining has been addressed, the stucco can be washed again with a cleaning solution. For most stains, a simple mixture of liquid dish soap and water will do the trick. Stubborn stains, such as those caused by mold and mildew, may require a bit more scrubbing with a soft-bristle brush or even a rotating brush attachment on a power washer. The stains will eventually disappear and the stucco can be left looking beautiful again.

Some homeowners choose to use a copper biocide on their stucco in order to keep it free of mold, mildew, and algae growth. When used correctly, this can keep the stucco looking its best and will not harm the environment. However, it is important to note that these products are not permanent and will have to be reapplied regularly. A professional can help determine if this is the right option for you. They can also offer suggestions on preventing future staining problems with your stucco. These suggestions may include placing a barrier of rock, mulch, or other ground cover over the dirt around your home to help stop it from seeping up on the stucco walls and making them discolored.

Water Damage

When stucco is damaged, water can seep through to the underlying substrate and cause extensive damage. This is often caused by roof or plumbing leaks, but can also occur from condensation if the building is not well ventilated. In any event, water infiltrating the stucco can lead to mold and mildew growth, which is often accompanied by a musty or damp smell.

Stucco repair for water damage can be difficult and should only be done by a professional. The first step is to remove any loose or crumbling stucco and clean the area to make sure it’s free of any mold or dirt. Next, the patch area must be sanded down so it is flush with the surrounding wall. Finally, it’s important to use a waterproof sealant on the entire area.

Once the sealant is dry, it’s time to start the actual repair. Using a hammer and chisel, carefully remove any areas of damaged stucco. If possible, try to leave some undamaged stucco in the corner of the repair area to help with ventilation. Pull back the metal lath (using tin snips) and house wrap or felt paper in the area of the stucco that is being repaired, but leave it in place on the margins of the damaged area. Use acrylic exterior caulk to seal the house wrap and lath seam.

When working on stucco repairs, be careful to use a mix that’s specifically designed for stucco. This will ensure that the patch will not only be durable, but that it will match the color of your existing stucco. It’s possible to buy pre-mixed stucco repair material, or you can mix it yourself in a wheelbarrow or plastic tray following the manufacturer’s instructions.

While some handy homeowners may be able to tackle minor stucco repairs on their own, any extensive water damage or structural issues should be left for professionals. For more serious issues, you may need to consider stucco remediation, which is a complete replastering of the wall system that addresses the underlying problems and prevents future moisture intrusion. Find vetted stucco contractors in your area today.

Mold

Stucco repair often includes cleaning and repairing mold. Mold growth usually means that there is moisture trapped behind the stucco and that this moisture is rotting the wood lath supports. This is a serious problem and can cause structural damage to the building.

The best way to prevent mold is by keeping the stucco free of dirt and debris. It’s also a good idea to carefully inspect the stucco for signs of moisture, including a musty odor and places that feel damp to the touch. Mold thrives in moist areas and likes to feed on organic matter, so examining the area surrounding gutters, doors, and windows is an especially good idea. It’s also a good idea too look around and closely examine any trees, flowers, or bushes that grow near the house to see if they are feeding on the stucco and contributing to the mold problem.

Aside from cracks, the most common sign that a property’s stucco is failing is staining or discoloration. This is often accompanied by a musty odor and the feeling that the stucco crumbles when touched. If you notice these symptoms, then it’s time to call for a professional inspection and repair.

Most stucco repair projects start with an initial inspection. During this time, the contractor will assess the damage, determine the cause of the problem, and recommend a course of action. This can range from simply spraying the stucco with a special water-resistant polymer, to replacing or reapplying more stucco.

When the underlying issue is remedied, it’s not uncommon for the entire stucco system to last much longer than if no steps are taken to protect it from moisture. The key is to create an adequate drainage plane that will allow the stucco and underlying materials to dry out before more significant damage occurs.

Remediation is not just a good idea for properties with failing stucco, but for all buildings. All types of buildings, including high-end luxury homes, can experience moisture problems that lead to rot and mold, which if not addressed quickly can destroy the building.

Navigation